
What Should You Check Before Mounting a Light or Laser?
Estimated reading time: 4 min
Summarize with AI
Share
Quick Answer
Before mounting a firearm light or laser, confirm that the accessory, firearm, mounting hardware and any holster are compatible. A secure rail connection is essential, but fit involves more than matching the general rail style.
- Mounting interface: Identify the firearm’s exact rail or mounting system and verify that the accessory includes the correct key, clamp or adapter.
- Clearance: Check the light or laser’s length, width and switch position against the trigger guard, muzzle area and other installed accessories.
- Controls: Make sure switches remain accessible and do not interfere with the firearm’s normal controls.
- Holster fit: Use a holster specifically designed for the firearm and mounted accessory combination.
- Installation requirements: Review the manufacturer’s instructions for hardware, torque, battery orientation and approved thread-locking products.
- Service access: Determine whether batteries can be replaced and lenses cleaned without removing the unit.
Before beginning your compatibility inspection: Treat every firearm as if it is loaded. Keep the muzzle pointed in a safe direction. Before cleaning or inspecting a firearm, unload it, remove the magazine, lock the action open, and visually and physically check that the chamber is empty.
Confirm the Mounting Interface
Start with the firearm manufacturer’s documentation. Handguns may use standardized or proprietary accessory rails, while rifles and shotguns may require a separate rail section, direct-mount interface or model-specific adapter. Similar-looking rails are not automatically interchangeable.
Compare the accessory maker’s compatibility list with the firearm’s exact model and configuration. Many compact lights and lasers use replaceable rail keys or inserts to control their position. Confirm that the required key is included and correctly identified in the instructions. If an adapter or rail section is needed, browse compatible gun parts rather than modifying the firearm or mount.
Inspect the mounting surfaces and hardware for damage, incorrect parts or obvious obstruction. Use only the screws, crossbolts, clamps and tools specified by the manufacturer. If compatibility remains uncertain, contact the accessory manufacturer or a qualified gunsmith.
Check Dimensions, Controls and Power Access
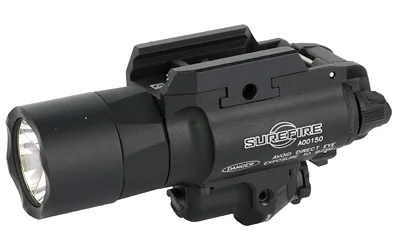
Compare published dimensions before installation. The body, bezel, battery door and switches should have adequate clearance from the firearm’s controls and other mounted equipment. On a long gun, also account for optics, sights, sling hardware and rail covers. Shoppers comparing sighting equipment can review optics and sights while planning the available mounting space.
- Confirm that the light bezel or laser housing fits the intended mounting position.
- Check whether control paddles, buttons or remote-switch ports conflict with existing components.
- Determine whether the battery compartment remains accessible after installation.
- Verify that the chosen battery type matches the manufacturer’s specifications.
- For lasers, review adjustment access and the manufacturer’s zeroing instructions.
Keep your finger off the trigger and outside the trigger guard until your sights are on the target and you have decided to shoot. Follow all firearm and accessory manufacturer instructions during installation and any post-installation checks.
Review Mounting Hardware and Maintenance Needs
A light or laser must remain firmly attached for its controls and adjustments to stay consistent. Follow the manufacturer’s specified tightening sequence and torque values. Do not assume that tighter is better; excessive force can damage screws, clamps, rail sections or accessory housings.
Use thread-locking products only when the manufacturer approves them, and confirm the specified type. Some mounting hardware is intended for dry installation, while other designs have different requirements. General firearm cleaning and maintenance supplies may be useful, but solvents and lubricants should not be applied to lenses, electronics, seals or mounting threads unless the accessory instructions permit it.
Consider routine upkeep before choosing a model. Check how the lens is cleaned, how seals are inspected and whether removing the unit is required for battery replacement. If removal is necessary, a laser may require verification or readjustment according to its manufacturer’s directions.
Verify Holster Fit and Intended Use
A handgun holster must be made for the specific firearm and mounted light or laser. Compatibility with the handgun alone is not enough. Accessory body shape, bezel size, switch design and mounting position can all affect fit and retention.
Check the holster maker’s exact compatibility listing rather than relying on descriptions such as universal or light-compatible. Review the holster’s material, retention system, adjustment range and access to the accessory controls. Browse holsters by firearm and accessory combination, then follow the manufacturer’s fitting instructions and seek qualified instruction.
Finally, match the accessory to its intended role. Compare light output specifications, beam pattern, switch options, battery format, laser adjustment design and environmental ratings. Review product warning labels and check current federal, state and local law.
BT Gun Company shoppers can browse lights and lasers for compatible options, then compare related firearm accessories needed to complete the setup.

About the Author: Jeff Brown
Jeff Brown is CEO of Fuzzy Holdings LLC and owner of BT Gun Company, a Class 7 FFL dealer since 2023. An NRA-certified Range Safety Officer who has been shooting since 1983, he teaches hunter safety at his local gun club, hunts spring and fall turkey, and has a soft spot for revolvers.